15 Dec

Blog Hop: Adding Atmosphere (the Stampin’ Up! post)

Mobile detail

Welcome, welcome to the Papercut Labs’ 12 Days of Christmas! Over twelve days the hop is providing you with some awesome Christmas projects to inspire you and (if you’re not already) get you totally in the Festive Spirit! To keep up with the hop and where it lands each day: visit our information page. And don’t forget to join the crop event for chances to win the giveaway prizes.

So where are you in the hop? DAY EIGHT! Make sure you check the blogs that have already provided inspiration, and head on over to Scrapmatts tomorrow for day nine.

Monday, 8 December 2014: Papercut Labs
Tuesday, 9 December 2014: A Piece of Cake Designs
Wednesday, 10 December 2014: Kellie Stamps
Thursday, 11 December 2014: Heidi Swapp (via Kim Jeffress)
Friday, 12 December 2014: The Scrappery
Saturday, 13 December 2014: Seriously Scrapbooking
Sunday, 14 December 2014: Maya Road (via Angella Peardon)
Monday, 15 December 2014: Stampin’ Up! << YOU ARE HERE
Tuesday, 16 December 2014: Scrapmatts
Wednesday, 17 December 2014: D-lish Scraps
Thursday, 18 December 2014: Studio Calico
Friday, 19 December 2014: Papercut Labs

Editor’s note: The Pacific region of Stampin’ Up! doesn’t have its own blog, so we talked it out with them. We’re hosting their post — and we’re so happy we are!

Today, Susan from Stampin’ Up! joins us and helps create some atmosphere to any Christmas table.

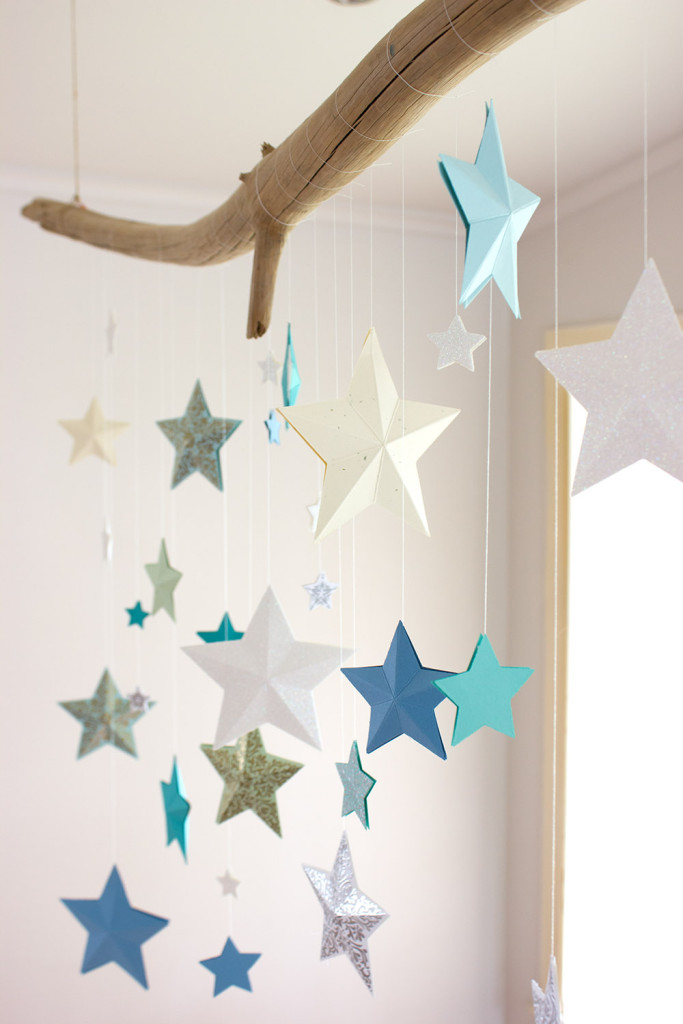
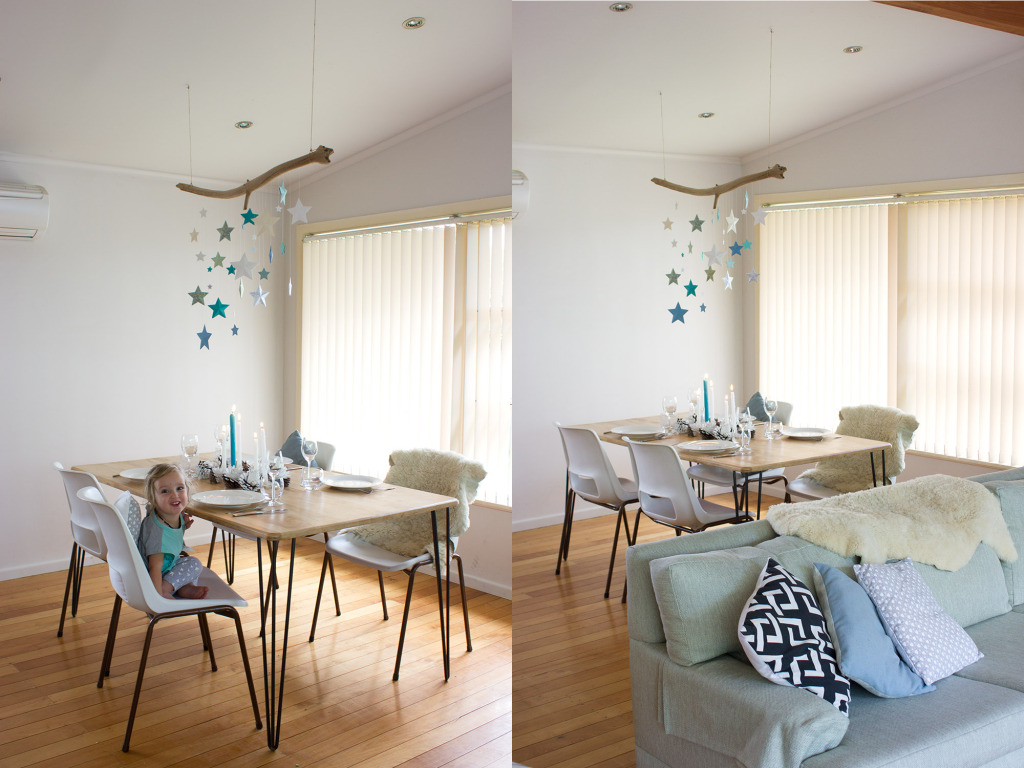
Stars Over-the-Table Christmas Mobile

Mobile Room Views

Supplies:
Inks: Versamark
Papers: Bermuda Bay, Marina Mist, Pistachio Pudding, Whisper White, Coastal Cabana, Soft Sky, Pool Party, Naturals Ivory, Dazzling Diamonds Glimmer Paper
Stamps: Bright & Beautiful
Accessories/Tools: Gold and Silver Stampin’ Emboss Powder, Stars Framelits Dies, Adhesive (I used Dimensionals and Sticky Strip)
Driftwood
Cotton Thread
Hemp twine or other for hanging
Two eyelet screws for ceiling

Make approximately 30 stars (see below — note, the smaller stars were left unscored, as you can see in this detailed photo). This depends on the length of your driftwood/branch/dowel of course. Make sure your threads are all about a 60–80cm long so you have some play when hanging.

Stars Instructions

Tie on your stars at varying lengths and hang to the ceiling. A friend to help you place it and get the strings the right length is definitely helpful!
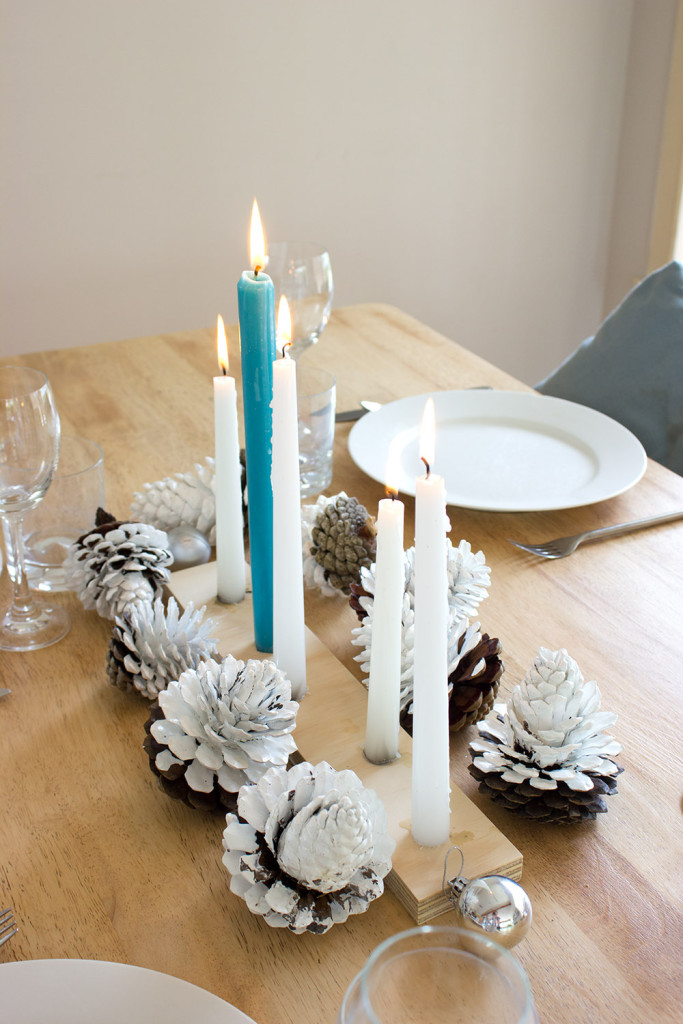


Dipped Pinecones

Table Setting detail

Supplies:
Pinecones, Baking Trays, Tin Foil, Paint of your choice

I went cone collecting with my four-year-old daughter where we braved all the bugs hanging out under the pine trees.

Bring them all home and bake on a tray lined with foil for two hours at 110C/225F.
This melts off the sap, kills all the creepy crawlies, dries out the cones and opens the ones that are closed. Plus it fills your home with a beautiful woody aroma!

Let them cool then remove any loose bits including the seed pods.

Dip in paint, drain as much paint off as you can then place on a fresh tray lined with foil and let dry. You could add glitter too if you’re game!

10 Dec

‘Just Believe’ Christmas Card Set by Tarrah

Hi there, everyone! Tarrah here with you today, and I hope you are all  getting organised for Christmas? I am very happy to say I am just about ready — thank goodness!

One of the traditions that I like to keep at Christmas time is making some of my own Christmas Cards for some of my close family..

I went looking through my stash of Christmas collections and stumbled across this beautiful one by Kaisercraft called Just Believe. I knew that the co-ordinating papers and embellishments would be perfect for some handmade cards!

Just Believe Christmas Cards

When I create cards, I like to create them with different orientations. Here, I have created two that open from right to left and the other one opens from bottom to top. I like the challenge of decorating the different size and oriented cards.

It is so much easier to create cards if you are using products from the one collection. It takes a lot of the guess work away from you especially if you are limited for time and a lot of us are at this time of year!

Do you create your own Christmas cards? I would love to know if any of you have created Christmas Cards using non-traditional colours! I am certainly not that game, but I love the look of them!

I hope you are getting some to create in between getting organised for the festive season!

Have a great day and thanks for visiting the Papercut Labs blog today!

P.S. Don’t forget there’s a blog hop and crop happening that’s being hosted by Papercut Labs. All information can be found on this page!

14 Nov

Project Life tip: using the typewriter

Hi everyone!  It’s Jodie here with you today and I’m super excited to have my first post on the Papercut Labs blog as a Project Life contributor!

My Project Life style is a little bit structured, but I also love to add in layers and lots of little embellishments.  I do use Project Life cards, but most of the time I prefer to use 12 x 12” patterned paper or a 6” paper pad, and make my own cards.

I have my Week 18 spread for you today with a few tips, so lets get started!

Here’s the left side.

Jodie-King-for-Papercut-Labs_1

And the right.

Jodie-King-for-Papercut-Labs_2

This week I’ve used Echo Park Paper Co’s Capture Life collection.  I’ve pulled a few patterned papers and this sticker sheet, which has lots and lots of embellishment options to choose from.  I’ve also used two 3×4” cards from Becky Higgins’ Midnight edition core kit.

Jodie-King-for-Papercut-Labs_3

I’ve kept my title card this week fairly simple. I attached a label sticker to the centre of the card, which I then fed through my vintage typewriter, centering my dates on the sticker.  Now, I’m (just…) old enough to have had typewriter lessons in high school, but for anyone that has grown up in the digital age, here’s a tip on how to centre your text on a typewriter.

First, feed your document through the roller until you have the line position correct.  Use the space bar to move across to where the centre of the text will be (in my case this was the centre of the sticker).  To centre the text we will need to backspace exactly half of the total spaces used, including letters, numbers, punctuation, and also any spaces.

The easiest way, I find, to do this is to backspace once for every second letter (or number, punctuation or space).

Using the text you want to type, say each letter out loud (remembering to include numbers, punctuation and spaces), and backspace once every second letter.  So for my example of “28 April – 4 May”, this is how I backspaced.  2 8 (backspace) space A (backspace) p r (backspace) i l (backspace) space hyphen (backspace) space 4 (backspace) space M (backspace) a y (backspace).  From that position you’re now…type away! Try this method and you’ll find you have beautifully entered text every time.

Jodie-King-for-Papercut-Labs_4

Because I had journaled about this photo on my right page, I chose to just add a few phrase and word strips from a Cosmo Cricket Tiny Text sticker sheet to this card, and added some enamel dots and Studio Calico wood veneers to represent Mum and daughter.

Jodie-King-for-Papercut-Labs_5

This simple filler card was made from patterned paper cut down to 3 x 4”.  I wanted to use the banner sticker, but if you look closely you can see that it was just a bit too wide to fit in the pocket.  Because it had good adhesive, I positioned it where I wanted it, and stuck it directly onto the outside of the plastic pocket.  I really like how it overlaps the pocket just that little bit.  I adhered the gold foil geotag to the patterned paper and slid it inside the pocket.

Jodie-King-for-Papercut-Labs_6

On the right page I had two 4 x 4” photos to use, but since I’m using a Design A pocket page, there are two pockets across the bottom that are each 6 x 4”.  To work around this I trimmed my right side photo in half at 2”.  I then adhered the remaining 4 x 4” photo and left side of the photo I cut in half to a 6 x 4” backing card to make sure they stayed in position. This slid into the left 6 x 4” pocket. I adhered the right side of my cut in half photo to the very left of another 6 x 4” backing card, leaving me a 4 x 4” journaling space on the right side of the photos.

The memorabilia on these photos is from the menu of the burger cafe I took the photos at.  Because the menu was a single A4 sheet I didn’t feel too bad about swiping one for scrapbooking purposes.  I might think twice about it if I was at a swanky restaurant though! (Taking a discrete photo of the menu like I did here is a better option in that situation ha!) I used a circle punch to punch out the café’s logo from the top of the menu, and trimmed a strip with some basic info about the café, which I backed with white cardstock to make it pop off the photos a bit more.

Jodie-King-for-Papercut-Labs_7

To finish off the remaining 4×4” journaling space I cut patterned paper to size, layered a frame and element stickers, and typed my journaling onto a label sticker.  Finally I added some more enamel dots, and that’s Week 18 done!

Thanks so much for dropping by the Papercut Labs blog today!

Jodie

29 Oct

Pinterest Inspired: Handmade Christmas Gifts by Tarrah

Hi everyone! It’s Tarrah here with you today. I wanted to get a start on some handmade Christmas gifts so I went to my number one place for some ideas and inspiration: Pinterest!

These cute magnets caught my eye straight away!

Magnet8Photo Credits: Sei Lifestyle

Supply List:

Scraps of patterned paper
Word Stickers
Rhinestones
Paper Doily
Embellishments
Mod Podge
Circle Chipboard Pieces
Magnets
Sandpaper
Hot Glue Gun
Sewing Machine

Step 1: Gather some of your patterned paper scraps and a little bit of paper doily and lightly adhere a few pieces together into a square shape (making sure that your round chipboard piece will fit) then adhere with some glue or Mod Podge to your chipboard.

These are the ones I made:

Crate Paper Magnets

Step 2: Cut off the excess paper and then sand right around the edges to give a nice finish to your circle. Machine stitch around a few of the papers edges and around the perimeter of the circle.

Step 3: Add some word stickers, rhinestones and embellishments like butterflies or hearts.

Crate Paper Magnets Detail

Step 4: Apply a light layer of Mod Podge over the whole circle to seal everything and then once the Mod Podge is dry, adhere the magnet to the back of the chipboard with a hot glue gun.

These cute magnets will be gifted to a couple of my girlfriends for Christmas who always love receiving a handmade gift from me!

I hope I have inspired you to get creating too, thank you so much for stopping by the Papercut Labs blog today!

Happy creating!
— Tarrah x

26 Sep

Lego Love

It’s hard to find a house without Lego. Somehow, it just ends up in our lives, even if we don’t buy it ourselves.

But what to do when you have spare pieces lying around?

They can make fantastic gifts. I am particularly partial to the Lego keyring (above), especially when matched with the Lego keyring holder (number two on the list). It’s getting to the end of the school year and Christmas is coming, why not get a little creative with those mis-matched Lego pieces?

(I grew up in a house with Duplo–basically huge Lego so the under-twos can’t eat it. If you made keychains with Duplo, you’d never lose your keys in your bag again!)

24 Sep

Start collecting those rolls!

Donna Macpherson-Williams is teaching our Christmas Projects class this year and she’s got an advent calendar up her sleeve to teach you. (A lot of tag fun, I believe!)

But, if you’re looking for a quick and easy and the kids-can-paint-it type of job, this might be your type of advent calendar! (Found via Pinterest) Made from cardboard, toilet rolls and a bit of butchers paper, you can decorate it as you wish.

And the kids will love it, because they get to punch through the paper each morning.