HELLO fellow Christmas enthusiasts and scrappers. This will be our last blog post of the year. It’s been a crazy year, and I’m so thankful for you all to be joining me on this journey.
But now, let’s get onto the reason you’re all here. =)
There were 176 people who participated in the crop party. We had 174 projects submitted, and 760 comments posted. That all adds up to 3581 entries into the draw.
Note: if you win a prize, you weren’t eligible to win another prize. We wanted to share the love around. =)
The winners of the Spotlight prize packs are…
Most Layouts Created: Karyn Schultz
Most Comments: Amanda Birchler
Most Challenges Used: Rachel Dutko
And now the Blog Hop prizes…
Papercut Labs: Lauren Tomecek, Aimee Dow, Amanda Case, Felicity Wilson A Piece of Cake Designs: Melinda Sweetman, Lisa Johnston Kellie Stamps: Amanda Hartmann, Louise Nelson Heidi Swapp: Judith Armstrong, Lauren Sims The Scrappery: Lesley Jaskowski, Lorraine Bate Seriously Scrapbooking: Julie Evers, Miriam Prantner Maya Road: Lizzy Hill, Gail Hutchinson Stampin’ Up!: Jasmine Tarnawsky, Paperpapier Blogspot Scrapmatts: Emily Aybar Flanders, Renee Gabriella Johnson D-lish Scraps: Nicky Normandale, Ashan Charmane Wimalaratne Studio Calico: Donna Macpherson, Tammi Harris
If you’re name is on the list, please email Ellen at hello [at] papercutlabs [dot] com with your name and address and we’ll get your prize out to you in the new year!
From Papercut Labs, I hope you have a wonderful holiday!
I made a process video while I created my layout also.
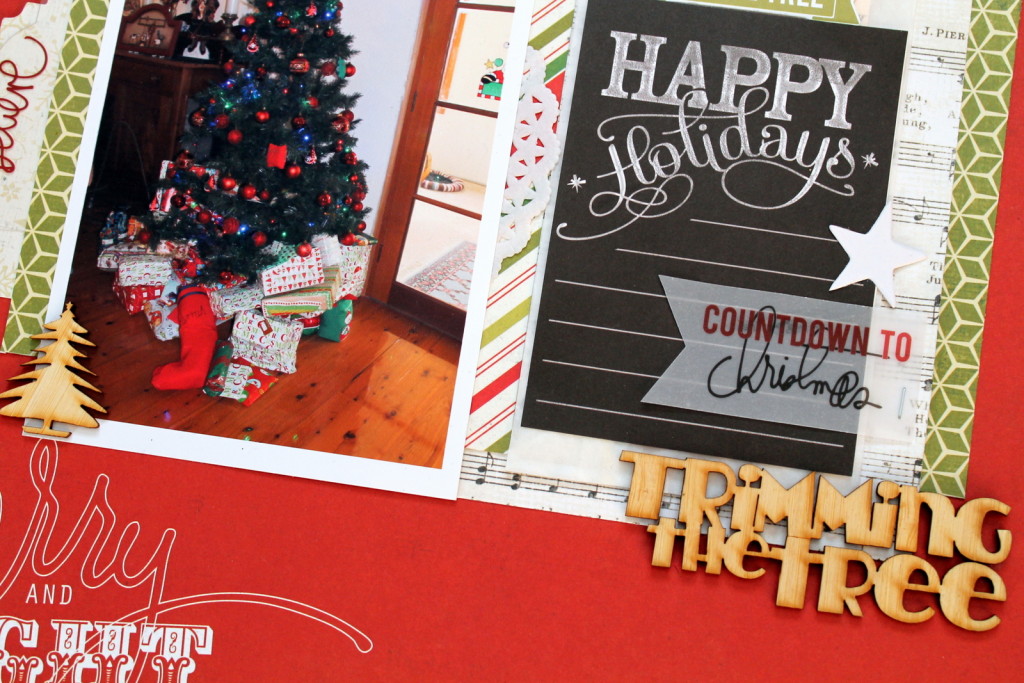
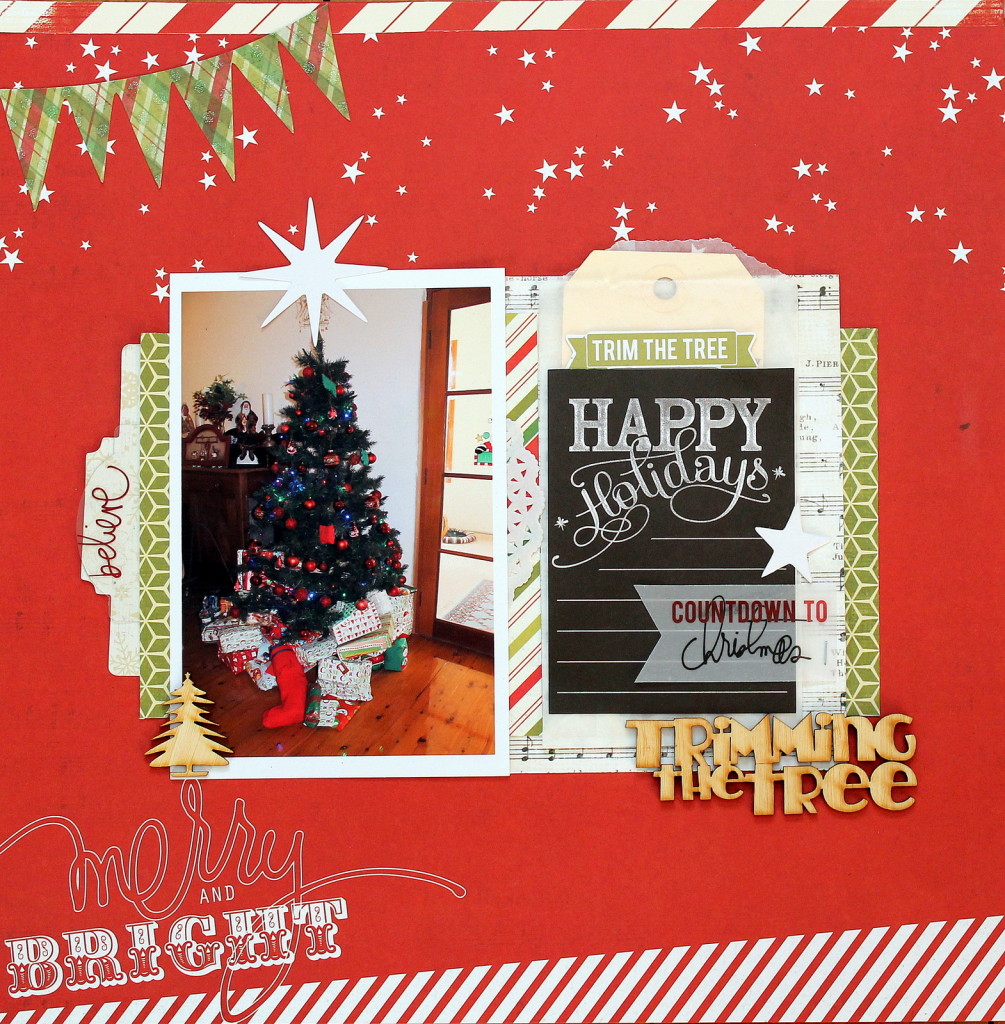
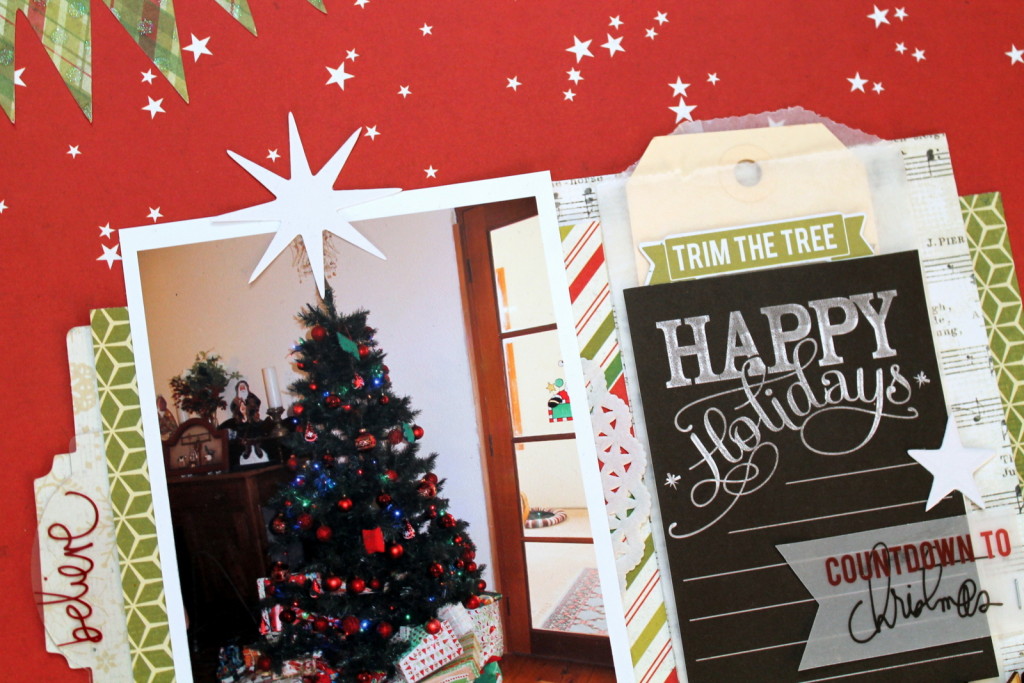
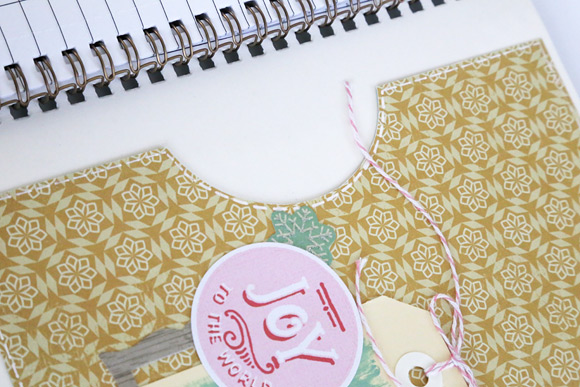
I have mainly used the Heidi Swapp ‘Believe’ collection on this layout. It’s one of my all time favourite Christmas collections. I have also added some Christmas themed wood veneer from Words or Whatever Chipboard.
I love to layer all different size and shaped papers to give dimension and add interest. I also add embellishments for extra decoration.
I quite often hide my journaling on my layouts by writing or typing my journaling on to a shipping tag, I then use a pocket or tuck it behind the papers.
Thank you so much for stopping by the Papercut Labs blog today…I would like to wish you and your families a very Merry Christmas and a safe and happy New Year!
Welcome, welcome to the Papercut Labs’ 12 Days of Christmas! Over twelve days the hop is providing you with some awesome Christmas projects to inspire you and (if you’re not already) get you totally in the Festive Spirit! To keep up with the hop and where it lands each day: visit our information page. And don’t forget to join the crop event for chances to win the giveaway prizes.
So where are you in the hop? DAY EIGHT! Make sure you check the blogs that have already provided inspiration, and head on over to Scrapmatts tomorrow for day nine.
Editor’s note: The Pacific region of Stampin’ Up! doesn’t have its own blog, so we talked it out with them. We’re hosting their post — and we’re so happy we are!
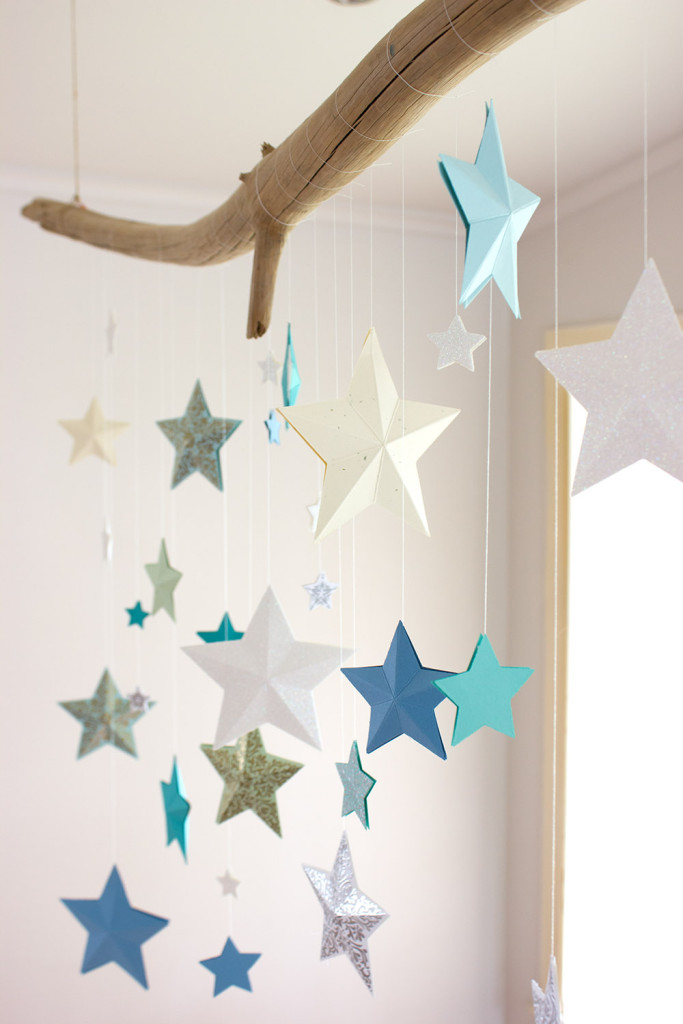
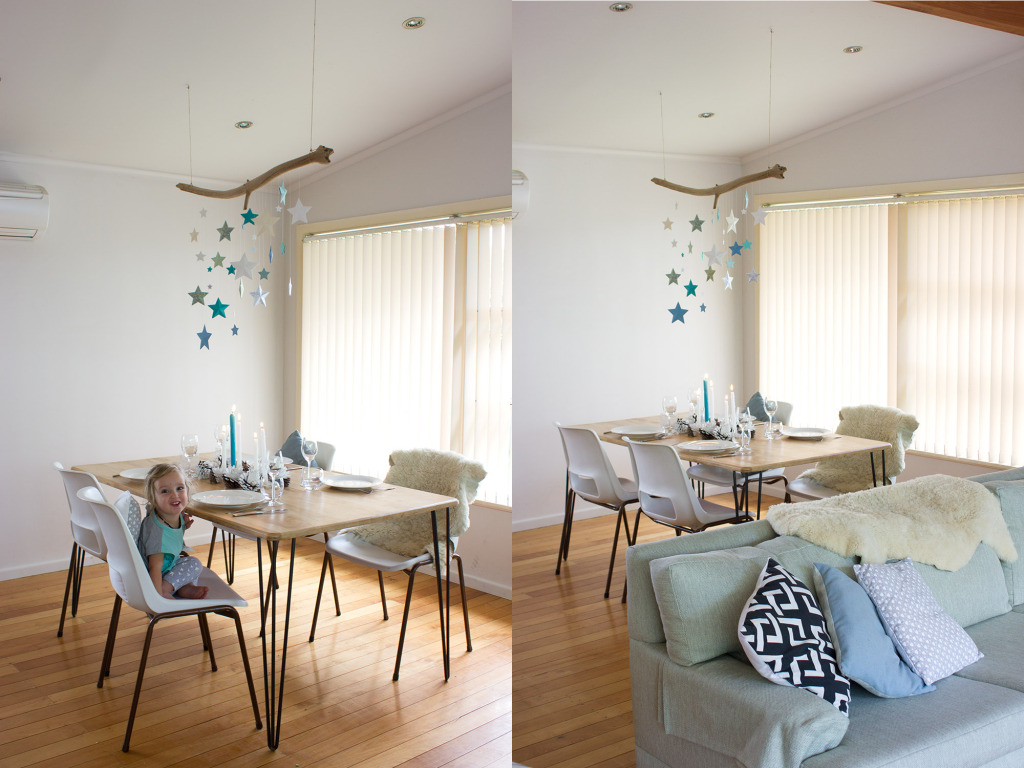
Today, Susan from Stampin’ Up! joins us and helps create some atmosphere to any Christmas table.
Stars Over-the-Table Christmas Mobile
Supplies:
Inks: Versamark
Papers: Bermuda Bay, Marina Mist, Pistachio Pudding, Whisper White, Coastal Cabana, Soft Sky, Pool Party, Naturals Ivory, Dazzling Diamonds Glimmer Paper
Stamps: Bright & Beautiful
Accessories/Tools: Gold and Silver Stampin’ Emboss Powder, Stars Framelits Dies, Adhesive (I used Dimensionals and Sticky Strip)
Driftwood
Cotton Thread
Hemp twine or other for hanging
Two eyelet screws for ceiling
Tie on your stars at varying lengths and hang to the ceiling. A friend to help you place it and get the strings the right length is definitely helpful!
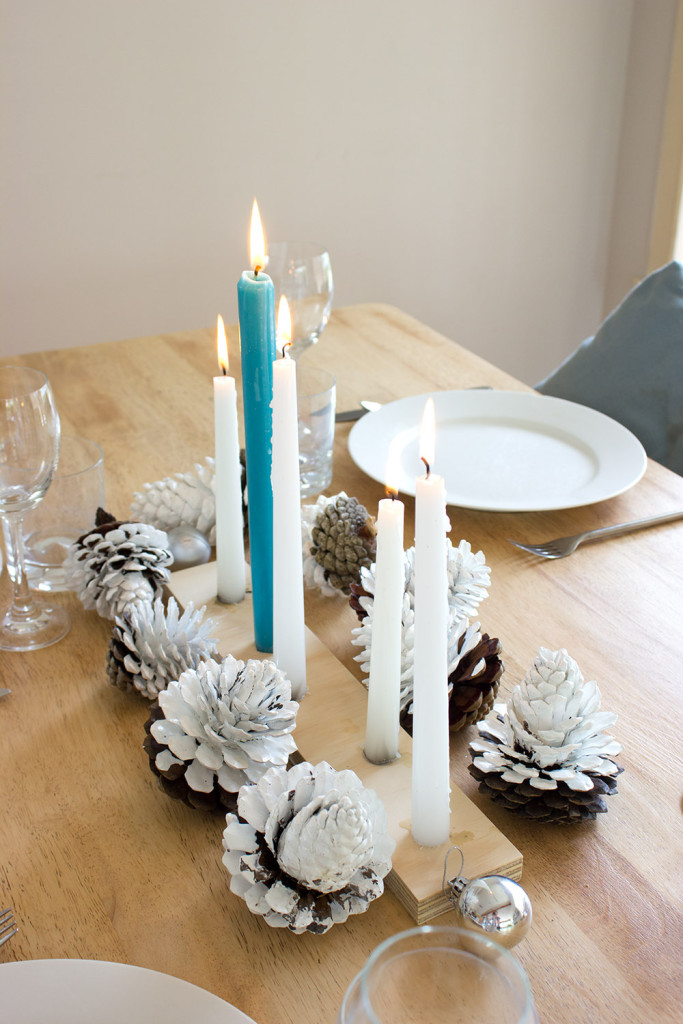
Dipped Pinecones
Supplies:
Pinecones, Baking Trays, Tin Foil, Paint of your choice
I went cone collecting with my four-year-old daughter where we braved all the bugs hanging out under the pine trees.
Bring them all home and bake on a tray lined with foil for two hours at 110C/225F.
This melts off the sap, kills all the creepy crawlies, dries out the cones and opens the ones that are closed. Plus it fills your home with a beautiful woody aroma!
Let them cool then remove any loose bits including the seed pods.
Dip in paint, drain as much paint off as you can then place on a fresh tray lined with foil and let dry. You could add glitter too if you’re game!
Hi there, everyone! Tarrah here with you today, and I hope you are all getting organised for Christmas? I am very happy to say I am just about ready — thank goodness!
One of the traditions that I like to keep at Christmas time is making some of my own Christmas Cards for some of my close family..
I went looking through my stash of Christmas collections and stumbled across this beautiful one by Kaisercraft called Just Believe. I knew that the co-ordinating papers and embellishments would be perfect for some handmade cards!
When I create cards, I like to create them with different orientations. Here, I have created two that open from right to left and the other one opens from bottom to top. I like the challenge of decorating the different size and oriented cards.
It is so much easier to create cards if you are using products from the one collection. It takes a lot of the guess work away from you especially if you are limited for time and a lot of us are at this time of year!
Do you create your own Christmas cards? I would love to know if any of you have created Christmas Cards using non-traditional colours! I am certainly not that game, but I love the look of them!
I hope you are getting some to create in between getting organised for the festive season!
Have a great day and thanks for visiting the Papercut Labs blog today!
Welcome, welcome to the Papercut Labs’ 12 Days of Christmas! Over the next twelve days we have some awesome Christmas projects to inspire you and (if you’re not already) get you totally in the Festive Spirit! To keep up with the hop and where it lands each day: visit our information page. And don’t forget to join the crop event for chances to win the giveaway prizes.
So where are you in the hop? DAY ONE! Make sure you check A Piece of Cake Designs tomorrow for stage two.
Monday, 8 December 2014: Papercut Labs << YOU ARE HERE
Tuesday, 9 December 2014: A Piece of Cake Designs
Wednesday, 10 December 2014: Kellie Stamps
Thursday, 11 December 2014: Heidi Swapp
Friday, 12 December 2014: The Scrappery
Saturday, 13 December 2014: Seriously Scrapbooking
Sunday, 14 December 2014: Maya Road
Monday, 15 December 2014: Stampin’ Up!
Tuesday, 16 December 2014: Scrapmatts
Wednesday, 17 December 2014: D-lish Scraps
Thursday, 18 December 2014: Studio Calico
Friday, 19 December 2014: Papercut Labs
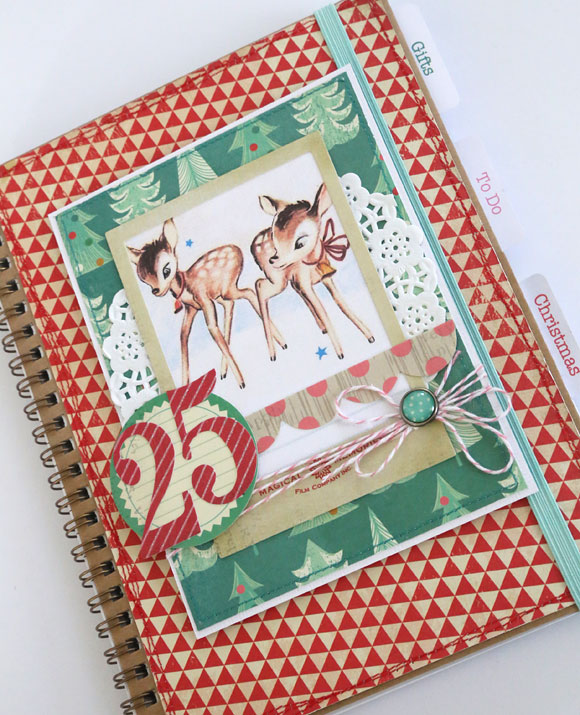
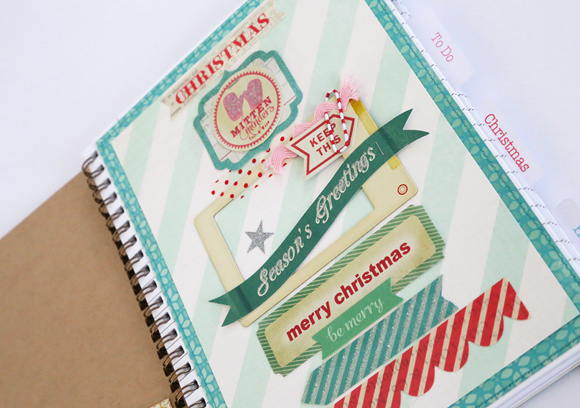
It’s Jodie for Papercut Labs with you today for the First Day of Christmas, and I have a project that can help you get organised for the Festive weeks ahead. (Note from editor: click the images to view a larger version of them!)
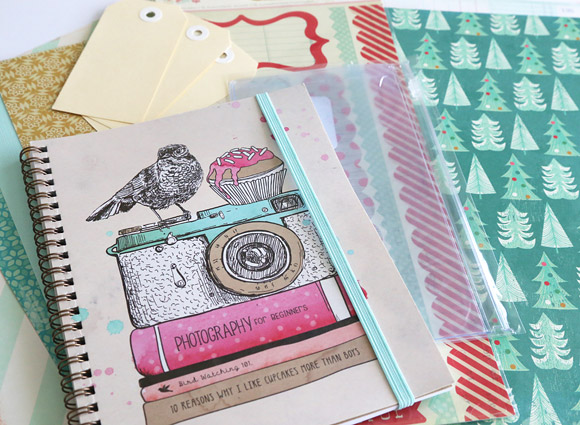
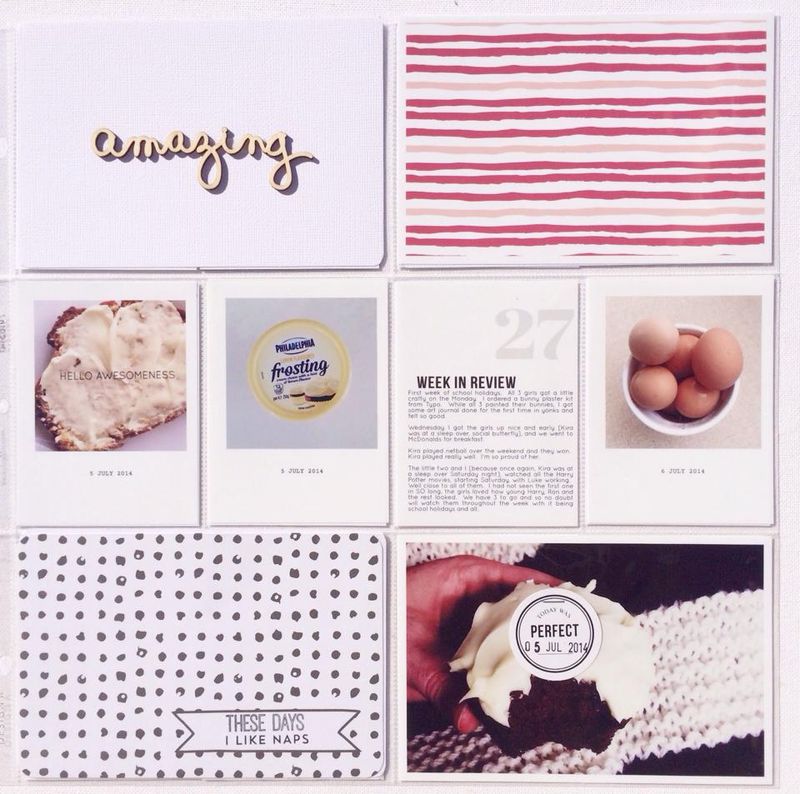
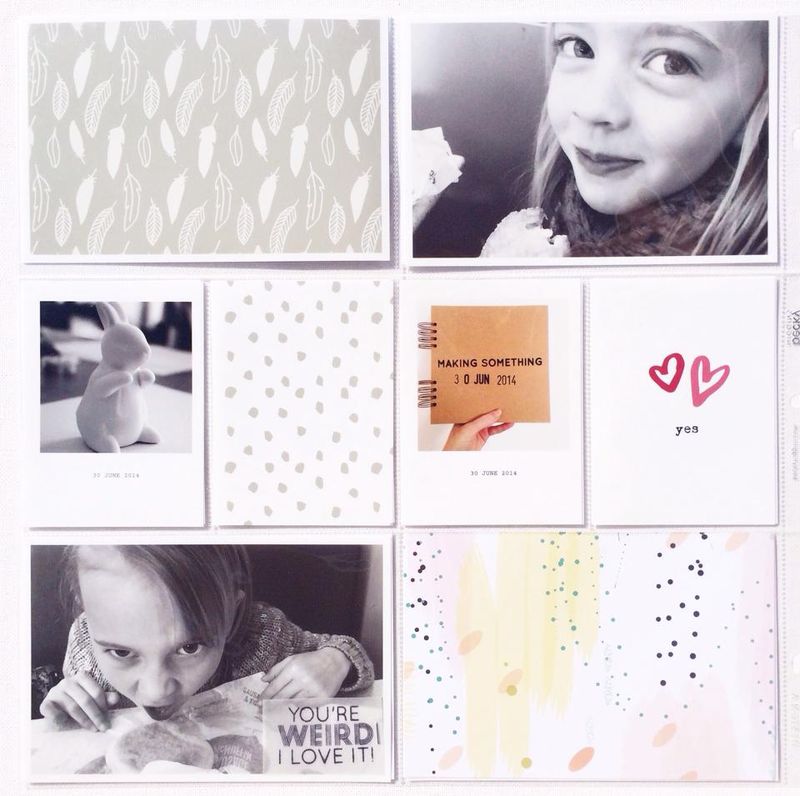
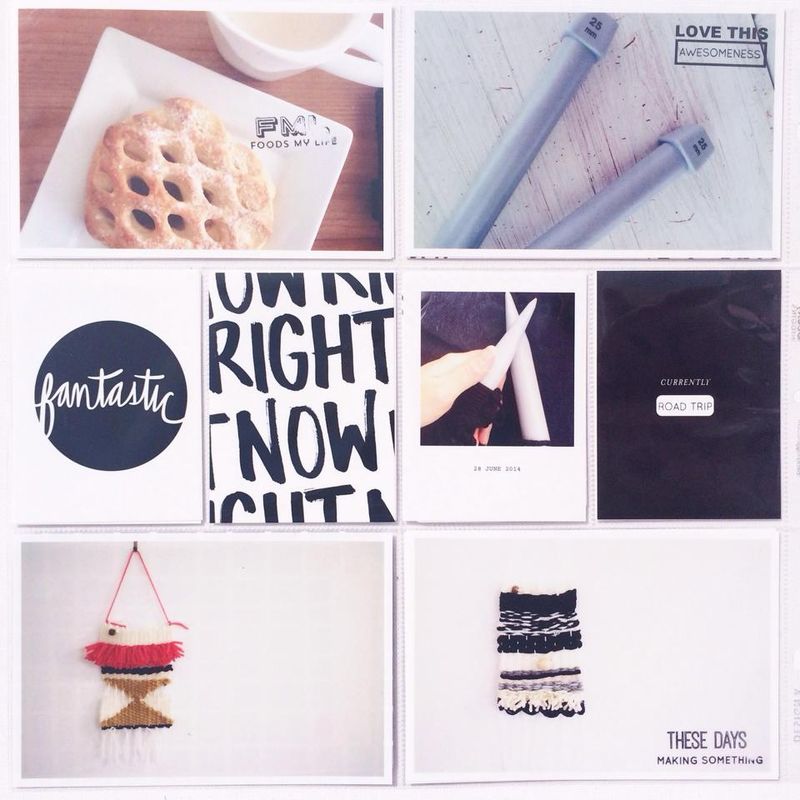
I don’t know about you, but when it comes to the busy time around Christmas I really need lists to stay on top of everything. Each year I grab a notebook that I can alter and use for the entire Festive Season, so that I can keep track of my notes, things to do, gift ideas, family holiday plans and anything else that pops up. Everything is in one place and easy to find which is definitely a good thing! With a few scrapbooking supplies, a sewing machine and a printer, you can put together a Festive Planner like this in no time at all.
My favourite notebook to alter is an A5 spiral notebook from Typo. They come with a back cover in heavy duty coloured cardstock and an elasticised band to keep the notebook tidy and secure. Because I remove the original front cover I love that they have a second inner cover also made from cardstock.
The back covers & elasticised bands come in different colours so you can pick a notebook according to your chosen colour palette.
For my other supplies I’ve used some papers from my stash from Crate Paper’s Bundled Up collection. I’ve also used some coordinating papers from other Crate Paper lines, Style Board and Oh Darling, some Bundled Up ephemera and some free Christmas printables from Marie Lottermoser. My full materials list is included at the bottom of the post.
The first step is to alter the front cover. With a pair of scissors remove the original front cover of the notebook. You’ll be left with a cardboard inner cover which will be the base for our festive front cover. In my case, the inner cover is kraft cardstock. Add a patterned paper which has been trimmed so that it’s just smaller than the notebook (creating a border) and then embellish as you wish.
I’ve chosen one of the Christmas free printables from Marie Lottermoser as a feature for my front cover. You can find these gorgeous fawns and three other designs on Marie’s blog.
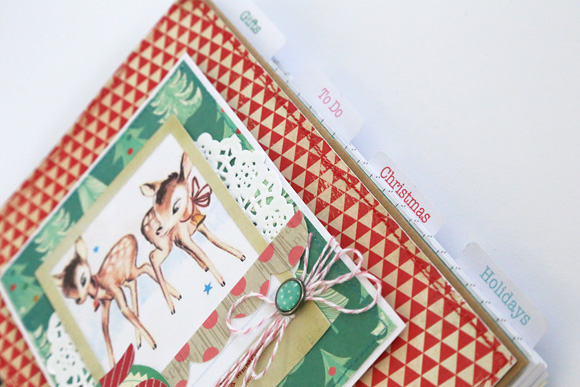
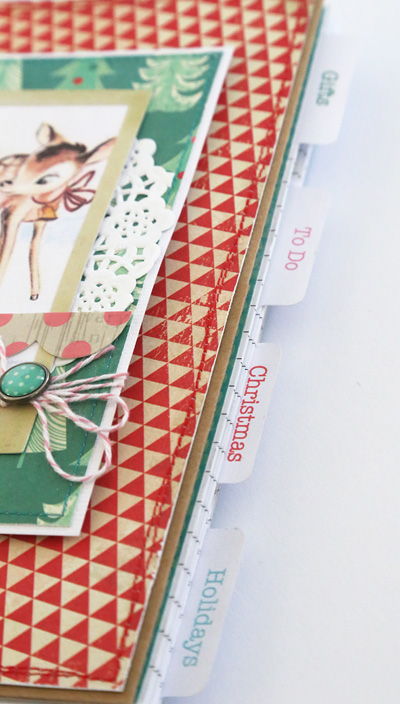
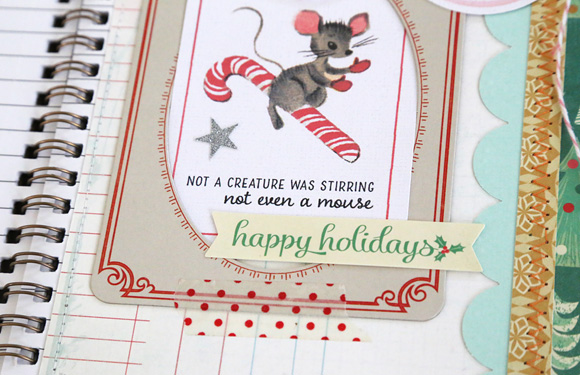
I’ve divided my planner into sections and added a tab to each one. This makes it easy to thumb straight to the section I need.
To make the tabs, I’ve typed my headings in Word, using a different colour for each title within my colour palette. I’ve printed these onto the smooth side of some white cardstock, and then punched each title out with a tab punch. If you don’t have a tab punch you can simply cut the words out in rectangles of the same size and use a corner rounder to round the top two corners of each rectangle.
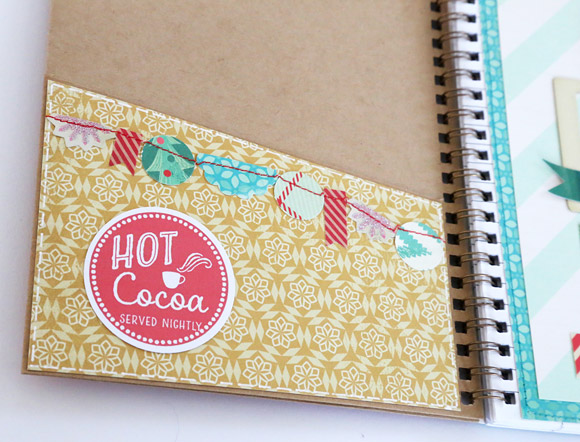
There’s already a pocket inside the front cover of the Typo notebook, but to make it a little more festive I’ve trimmed it so the top of the pocket runs diagonally.
To do this measure one inch (1″) down from the top of the pocket on the right side. Line that mark up with the top edge of the pocket on the left side and mark with a pencil. Cut away the top portion with scissors. Add some patterned paper cut to size and embellish.
The next step is to add strength to each heading page so that its not easily torn out of the notebook.
Adhere the tab for the section in place on the sheet of notepaper, and adhere a piece of patterned paper cut to size over the top. Add another two notebook pages (you’ll now have a piece of patterned paper and three notebook pages in total), and using a sewing machine stitch them all together around the outside edge. (Tip: to stitch close to the spiral you can use a zipper foot on your sewing machine.) This makes a sturdy section header page that won’t tear out of the planner easily. Then you can embellish your page. Repeat this step for each heading page in your notebook.
You can create as many sections and tabs in your festive planner as you like. This year I’m happy with four sections: one for keeping track of gifts to buy; one for chores that need doing before Christmas; another for Christmas itself, (for things like recipes that I want to make for Christmas Dinner, grocery lists, Christmas treats to make); and finally one for our family holidays (lists of things we need to pack, places we want to visit while on holidays).
The circle printables I’ve used throughout my planner are also from Marie Lottermoser. They’re a set of 9 that suit a 2” circle punch, and you can find them on her blog here.
As I’ve embellished each page, I’ve coordinated the colours to match the font colour on the corresponding tab.
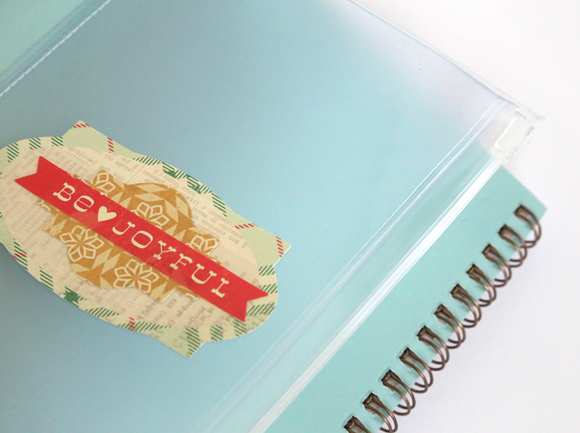
To add an extra storage area on the back of the planner I’ve used a plastic sealable pocket that I picked up for a bargain from Officeworks.
I’ve positioned it on the outside of the back cover and stitched it in place along the bottom edge with my sewing machine so that it’s securely in place. I’ve then added a couple of stickers and some die cut patterned paper straight onto the plastic pocket.
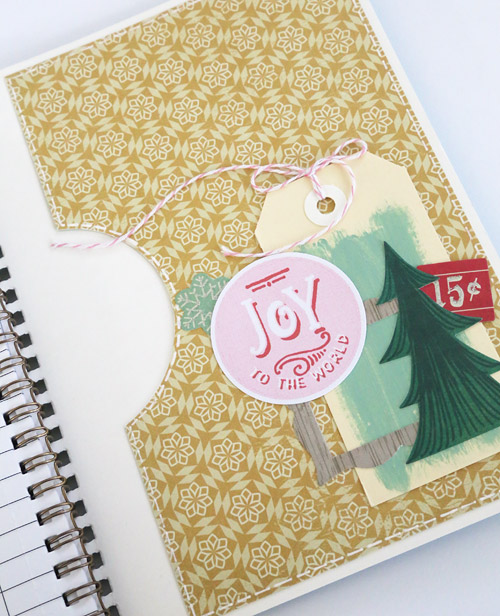
Once the plastic pocket is stitched to the back you can then add another pocket to the inside of the back cover.
Trim a piece of patterned paper to size, then using a large circle punch, punch a semi circle on one side of the pocket.
Attach your pocket using double sided tape on the three straight edges and embellish. Because I didn’t want to stitch through the back cover I faux stitched this pocket using a white rollerball pen.
As an extra little place to secure notes or to mark a place in my planner, I’ve given a wooden peg a bit of festive treatment. I’ve watered down some gesso to create a white wash for the top portion of the peg, and then painted the bottom portion with Mod Podge and added a good coat of red glitter.
This really is a quick festive project that will help you keep all your Christmas planning in the one easy to find place!
Thanks for joining me on day one of the 12 Days of Christmas blog hop! Don’t forget that the crop is still open and you can try to win giveaway prizes right up to December 20!
— Jodie
Materials: Typo A5 spiral notebook, Officeworks sealable plastic pocket, patterned paper – Crate Paper Bundled Up, Style Board & Oh Darling collections, American Crafts cardstock, Crate Paper Bundled Up Accent Stickers & Ephemera, Crate Paper frames, Heidi Swapp Mixed Company Buzz Words, My Minds Eye brad, October Afternoon labels, Sizzix die, bakers twine, wooden peg, glitter, shipping tag, acrylic paint, gesso, doily, Christmas free printables from Marie Lottermoser, ric rac, scallop edge punch, washi tape, paperclips
Today is another Five Minutes With interview — this time with OTP Queen Angella Peardon.
1) We’re coming into summer (yay!)–how do the seasons effect your crafting?
The hot weather means I tend to scrap a lot later into the wee hours then the cold winter season, but I do find that the seasons reflect into more of my colour mood board that I scrap with.
2) You’re on the Maya Road DT and the Simple Stories DT. Could you name your top three products from each for the silly season?
This is a hard one as I have so many favourite products! But, if I had to choose… For Maya Road, I’d go with: cotton spools, trims and wood. For Simple Stories: DIY Christmas range, photo stickers and insta squares.
3) What about non-DT related items?
You can’t get me away from anything vintage. I’ll pick up all sorts of bits and pieces. At the other end, I love digital brushes. And I love fabric, it gives my projects a different feel to them.
4) How do you go about recording your Christmas season?
Simple: mini books and more mini books. lol.
5) Any big plans for next year?
I’m teaching in Europe in May and June next year, but I’m also continuing work on a new project (in the scrappy industry) that I have been planning on for some time.
Thanks so much for spending time with us today, Angella!
Today, I’ve been lucky enough to interview the wonderfully talented, Kellie Winnell, blogger of Give a Girl a Blog, owner of stamp business Kellie Stamps. And she’s one of our sponsors for the 12 Days of Christmas event!
First, a few of Kellie’s most recently layouts:
1) Tell us your papercraft story. The how, the why and the when.
I’ve been papercrafting for almost 8 years. WOW that seems like a lot when I say it like that and to be honest it doesn’t feel that way with learning new things all the time. I started out scrapbooking, moved to purely cardmaking for a few years, back to scrapbooking, smash books then to project life and haven’t looked back.
2) Project Life seems to be your preferred style, what was it about PL that appealed to you?
The story telling, the memory keeping and the documenting of everyday life. In this day and age we all take so many photos. I like that this system allows for me to use many in one spread and share them with my family and my blog readers.
3) What made you want to start your own stamp business? Where do you find your design inspiration?
I started because when I was getting into Project Life I was frustrated with the lack of Australian way in stamping. I look back and I’m so glad I got into this, I absolutely love it. I get it from my family. By this I mean I look back over my album and think, what quote would suit that photo, saying etc and I go from there. People tell me, it’s like you’ve designed them for my pages. In a way they are?
5) What has been the biggest lesson for you in papercraft? What’s the best piece of advice?
Two birds, one stone here… Don’t compare would be a lesson I learnt and my advice for you. I know some people don’t do this at all and my hat goes off to them. Then I know many people that have done or do and have blogged about it. Once I start comparing I start to get doubt in my work, design and pages. When I’m not? I’m on a roll, loving every moment and enjoy it so much. Lesson learnt!
If you’ve ever wondered how our classes run or what they’re like, this is a great opportunity. And the best part? Once you have it, you have it forever! It doesn’t matter if the price increase, or if we no longer sell it, YOU will always have it.
Do a little dance and celebrate! And while you’re doing that, think about joining our previous classes. They have finished, but are still up for sale!
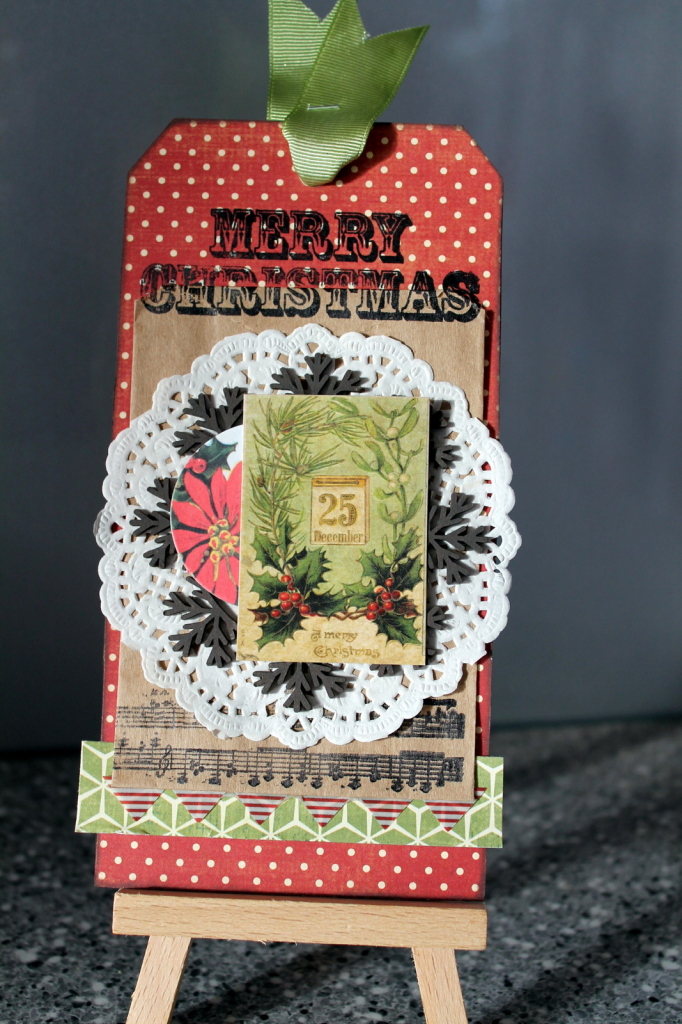
Hi there, everyone! It’s Tarrah here with you today to share a cute tag I created recently. I have been scouring Pinterest for some Christmas Craft inspiration lately and I came across this beautiful Christmas Tag created by Karen Shady. I loved the vintage look to this tag!
Created by Karen Shady
I decided to create a Vintage Christmas tag of my own and keeping up with the Papercut Labs 12 Days of Christmas events and challenges, my tag below meets challenge number 12: Must Be Xmas-y!
Products used for my tag:
Ranger Manilla Tag
Heidi Swapp ‘Believe’ Papers and Ephemera
Tim Holtz Vintage Sticker and Mini Staple
Jenni Bowlin Studio Chipboard Button
Words or Whatever Mistletoe Wreath Chipboard
Teresa Collins Stamps
Versacolour and Staz-On Inks
Kraft Bitty Bag
Paper Doily
Grosgrain Ribbon
Created by Tarrah McLean
When I first grabbed the paper doily to add to my tag, I felt it was too white looking so I toned it down a little with some Versacolour Grey ink to give it more of a vintage look. I also inked the edges of the tag and the chipboard wreath in Versacolour Pinecone Ink as well.
I made a process video while I created my tag. You will see in the video that I go to use all different elements on my tag but I end up choosing some different elements and add those instead!
Thanks so much for stopping by the Papercut Labs blog today. Have a great day!


